You
are probably wondering what volumetric
analysis is on about.
Volumetric
analysis is the use of the titration technique to determine the concentration
of a solution whose concentration is not known.
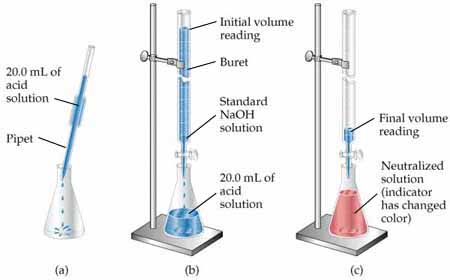
In
a titration, a measured volume of a
solution of known concentration is added (from a burette) to a known volume of another solution
(measured from a pipette) whose concentration
we don’t know until the reaction is complete.
The
point at which the reaction is complete, the equivalence point or the stoichiometric point, can be shown visibly
by a colour change of an indicator dye
in the measured solution.
This
point is known as the end point of the
titration.
Because
volumes of solution are being measured this technique is termed volumetric
analysis.
This
is from Chemwiki:
“Titration is the slow addition of one solution of a known concentration (called a
titrant) to a known volume of another solution of unknown concentration until
the reaction reaches neutralization, which is often indicated by a color
change.”
You
will probably have already carried out a titration.
The
kit looks like this:

I’ve
see several diagrams on the net where I
would take exception to the way the set up has been arranged
First
off, here is a set up where the
indicator has been placed in the solution in the burette!!
No,
because that alters the concentration of the solution in the burette since
acid-base indicators are usually weak acids.

and
here:
In
subsequent posts I’m going to discuss three
types of titration
1) An acid-base
titration
2) A redox titration
3) A precipitation
titration
Let’s
begin by looking at an Acid Base
titration
There
three types of Acid Base titrations
a) strong acids with
strong bases
b) strong acids with
weak bases
c)
weak
acids with strong bases
The
titration technique is the same for each but the indicator may need to change
to reveal the specific end point as each end point occurs over a different pH
range.
Let’s
look at the technique first then at
the particular differences between these three acid base titrations
The Titration
Technique
The
example I’m going to discuss is that between a strong base, sodium hydroxide
solution and the weak acid, sodium hydrogen phthalate C8H5O4K.
This
titration is often carried out because sodium
hydroxide solution on standing in the lab changes concentration.
It reacts with
carbon dioxide in the air to form sodium carbonate–you can sometimes
see a white solid around the neck of a bottle of sodium hydroxide or even small
slivers of the solid in the alkaline solution.
2NaOH(aq) + CO2(g) =
Na2CO3(s)
+ H2O(l)
So
to check the sodium hydroxide solution we are going to use is the concentration
it says it is on the bottle we need to carry out a titration.
The
acid used (sodium hydrogen phthalate
C8H5O4K) is a stable solid that does not decompose in solution or on standing in
the lab.
It
is known as a primary standard
because its solution is used to standardise the solution of sodium
hydroxide.
Sodium
hydrogen phthalate C8H5O4K is an acid in aqueous solution because it has
one hydrogen atom that dissociates.
It
is monoprotic or monobasic producing
one mole of hydrogen ions per mole of
compound.
To
simplify the structure I’m going to call sodium hydrogen phthalate C8H5O4K
simply HA.
Dr
Carr’s Rescue Box gives you more details of this interesting compound.
So
the equation for the reaction is the simple one of acid plus base giving salt
plus water.
HA(aq) +
NaOH(aq) = NaA(aq)
+ H2O(l)
Or
as an ionic equation H+ +
OH– = H2O
To
reveal the end point of the titration we use an acid/base indicator in this
example it is phenolphthalein.
Phenolphthalein is colourless in acidic solution and magenta in alkaline solution.
The
point at which one drop of the alkaline solution (or even less) turns the
indicator the faintest pink or magenta is the end point of the titration.
The
acid base reaction is now complete because an exact number of moles of H+ ions
have just neutralised the exact same number of OH– ions.
Here
are some tips on carrying out the practical itself.
1.
Rinse a burette with the sodium
hydroxide solution. Then fill it with
the same solution and don’t forget to fill the jet below the tap this is a very
common mistake I have found with students.
It leads to over-estimates of the volume run out of the burette to
neutralise the solution in the flask.
2.
Use
a pipette filler to first rinse out the
pipette then fill it with the acidic solution in this example. Transfer the specified volume (usually 25ml)
to the 250ml conical (Erhlenmeyer) flask.
3.
Add
2 or 3 drops of phenolphthalein
indicator to the solution in the flask.
4.
Run
sodium hydroxide solution from the
burette into the conical flask swirling the flask as you do so. As this titration is a rangefinder (or trial run) you just need an approximate volume of
sodium hydroxide needed to neutralise the acid in the flask. So stop running
the sodium hydroxide solution into the flask when the indicator has turned
pink.
5.
Repeat the titration but this time as
you near the approximate end point add
the sodium hydroxide very slowly, drop by drop until the solution in the
flask remains just faintly pink after swirling.
6.
Read
the burette to the nearest 0.05ml. You
may find a white card placed behind the
burette helps you to see the gradations and a line drawn down the middle of
the card helps you to pin point the actual value to the nearest 0.05ml. Some
burettes are produced with this blue line and white background on the glass of
the burette tube.

8.
The
YouTube video helps at this point. You
can see in the picture that the line behind the burette really helps you to
read its value precisely.
9.
Notice
too that in this example we are reading what’s left in the burette but in the titration
we need to read what’s run out of the burette. So we must read down and therefore we can see
that 42.3ml have run out of the burette.
Reading the burette is another place where many students in my
experience have made mistakes.
10.
To
finish the experiment you need to repeat the titration at least three times or
until you have concordant readings (that is readings to within 0.1ml of each
other) for the volume of sodium hydroxide needed to neutralise the acid in the
flask.
11.
Achieving
concordant readings is another challenge because it means you have to wash and
rinse out your apparatus carefully and thoroughly between titrations.
12.
The
final tip is to wash out the burette very thoroughly with distilled water after
the experiment is over since sodium hydroxide is able to dissolve glass and
alter the bore and capacity of the burette if left in the instrument for a
length of time.
13.
At
the start of your experiment you might have a results table that might look like
this:
|
Pipette
solution
|
Sodium hydrogen phthalate
|
0.1 mol/dm3
|
25ml
|
|||
|
Burette
solution
|
Sodium hydroxide
|
approx. 0.1mol/dm3
|
|
|||
|
Indicator
|
Phenolphthalein
|
|
|
|
||
|
Burette
readings
|
Rangefinder
|
1
|
2
|
3
|
(4)
|
|
|
Final
reading (ml)
|
|
|
|
|
|
|
|
First
reading (ml)
|
|
|
|
|
|
|
|
Volume
used (ml)
|
|
|
|
|
|
|
|
Mean
titre (ml)
|
|
|||||
In
the next post I’ll discuss titration curves and show you how to carry a
calculation based on a set of titration results from an experiment like this
one.


No comments:
Post a Comment